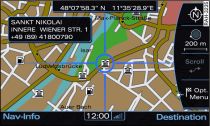
- Fig. 1 Changing a destination with the crosshairs

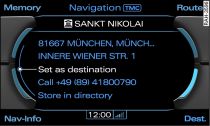
- Fig. 2 Setting map position as destination

- Fig. 3 Suggested routes
A point on the map can be set as a destination or stopover, stored in the directory and even called up on the telephone*.
Important: Navigation mode must be activated Link.
Press the Map control button. A map will appear on the MMI display.
Use the joystick to move the crosshairs Fig. 1 horizontally, vertically or diagonally to the desired destination
Link
Press the rotary pushbutton. The map legend menu will then be activated.
Turn the rotary pushbutton to Opt. Menu and press to confirm. The Map position menu will be displayed.
Turn the rotary pushbutton to Set as destination and press to confirm.
Turn the rotary pushbutton to Set as single destination or Set as stopover Link and press to confirm.
Start route guidance by turning the rotary pushbutton to Start route guidance and then pressing the rotary pushbutton. The route criteria and subsequently the map with three possible routes Fig. 3 will be shown on the MMI display.
To select a route, turn the rotary pushbutton clockwise or anti-clockwise and press it.
If a destination is not available in the navigation data, you can move the crosshairs to the position of the desired town/location and use the geographical data as the destination or add the data to a directory entry.
Note
- If you do not move the crosshairs for a moment, you will receive additional information on the position of the crosshairs (e.g. town or street name, if available).
- To be able to locate a destination with the crosshairs more quickly, simply make the map scale larger or smaller by turning the rotary pushbutton to the left or right.
