|
Applies to: vehicles with auxiliary heating/ventilation and remote control
Selecting a menu
Press the
 button on the remote control*.
 button on the remote control*.
You will see the symbols
 and
and
 on the left side of the display. The arrow points to the selected menu. To change menus, press the
 button again.
 and
and
 on the left side of the display. The arrow points to the selected menu. To change menus, press the
 button again.
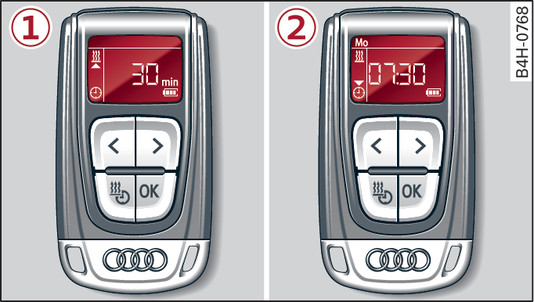
-1- Switching on immediately
Select the
 menu.
menu.
 menu.
menu.
To increase/reduce the running time, press the > or < button.
To confirm the running time, press the OK button. The
 symbol will flash while the data are being transmitted to the vehicle.
 symbol will flash while the data are being transmitted to the vehicle.
When the data have been successfully transmitted and the auxiliary heating/ventilation has been switched on, the time setting and the
 symbol will appear. The remote control switches off automatically after a few seconds.
 symbol will appear. The remote control switches off automatically after a few seconds.
-2- Setting the timer
Select the
 menu.
menu.
 menu.
menu.
Enter the hour, minutes and date, one after the other. Confirm each entry with the OK button. When you confirm the last entry, the
 symbol will flash and the data will be transmitted to the vehicle.
 symbol will flash and the data will be transmitted to the vehicle.
When the data have been successfully transmitted, the time setting and the
 symbol will appear. The remote control switches off automatically after a few seconds.
 symbol will appear. The remote control switches off automatically after a few seconds.
Checking / clearing the settings
To check the settings, press the
 button.
 button.
To clear the settings, confirm the query
 OFF? or
 OFF? with the OK button.
 OFF? or
 OFF? with the OK button.
The timer settings entered on the remote control are displayed as Timer 1 on the infotainment system.
The range of the remote control is about 400 – 600 metres; however this can be greatly reduced by obstacles (buildings, etc.) between it and the vehicle.
Fault warnings
If any of the following symbols appear when you switch on the remote control*,
the remote control cannot be used to switch on the auxiliary heating:
 - There is a system fault in the auxiliary heating.
 - The auxiliary heating cannot be switched on because there is not enough fuel in the tank.
 - The auxiliary heating cannot be switched on because the vehicle battery charge is too low.
 - The vehicle could not receive the transmitted data.
