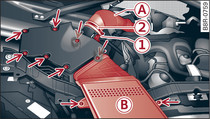
- Fig. 1 Engine compartment: Air cleaner housing

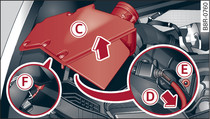
- Fig. 2 Air cleaner housing: Removing

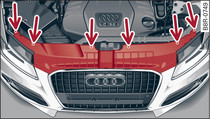
- Fig. 3 Trim panel: Attachment points are marked by arrows
Applies to vehicles: with halogen/xenon headlights
The air cleaner housing can be removed to facilitate access to the right headlight.
Removing
Switch off the ignition and the lights.
Open the bonnet.
Take the screwdriver and the interchangeable Torx bit* out of the vehicle tool kit Link.
Remove the trim panel above the radiator grille Fig. 3.
Remove the retaining screws -arrows- Fig. 1.
Unplug the electrical connector -1-.
Unfasten the hose clip -2- and detach the air hose -A-.
Remove the air duct -B- completely.
Lift out the top section of the air cleaner housing -C- Fig. 2 together with the air filter element.
Disconnect the vacuum hose -D-.
Compress the rubber on both sides to release the fastener -E- and lift off.
Unplug the electrical connector* -F- at the side of the bottom section of the air cleaner housing.
Carefully take out the bottom section of the air cleaner housing.
Installing
Perform all of the above steps in reverse sequence.
Caution!
Please exercise particular care when removing/installing to avoid damage to components.
Note
The layout and procedure may differ slightly on some engine versions. The installation/removal procedure should be adapted as appropriate.
