-

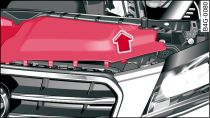
- Fig. 1 Engine compartment: Trim panel (pulled up) and attachment points
-

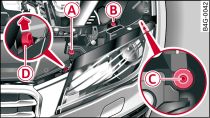
- Fig. 2 Left headlight: Securing screws and headlight catch
Applies to vehicles: with xenon headlights
The description for removing the headlight refers to the left headlight; the procedure for the right headlight is similar.
Switch off the ignition and the lights.
Open the bonnet.
Take the screwdriver and the Torx bit out of the vehicle tool kit
Link.
Insert the Torx bit in the screwdriver handle.
Pull the trim panel slightly upwards in the area near the headlight. First detach it at the front (as far as the centre of the vehicle) by pulling the front of the trim panel upwards Fig. 1.
To remove the headlight, slacken screws -A-, -B- and -C- Fig. 2 about five turns anti-clockwise.
Pull up the headlight catch -D- and carefully pull the headlight slightly forwards.
The electrical connector leading to the vehicle is located on the back of the headlight. Press the catch on the electrical connector towards the rear and unplug the connector.
Detach the vent hose from the headlight housing.
Carefully pull out the headlight towards the front.
Caution!
Take particular care not to damage or scratch the adjacent parts of the body when removing or installing the headlights.
