To change the bulbs, you must remove the rear light. Removing the light requires a certain degree of practical skill.
The description for changing the bulb refers to the left rear light unit; the procedure for the right rear light unit is similar.
Check which of the bulbs is defective.
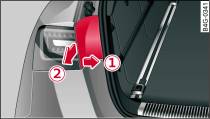
Using the screwdriver (from the vehicle's tool kit), release the trim at the bottom in the direction of arrow -1- Fig. 1 and pull it towards the rear -2-.
Remove the trim.
Remove the two securing screws using the Torx screwdriver (from the vehicle's tool kit).
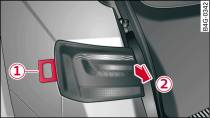
Carefully slide the removal wedge -1- Fig. 2 (from the vehicle's tool kit) into the gap between the body and rear light Caution!.
Pull the rear light in the direction of arrow -2- until it comes free.
Unplug the electrical connector.
Change the defective bulb Link.
When removing or installing the rear light, take care not to cause any damage.
- Removing the rear light in particular can lead to the paintwork or rear light becoming damaged. This is another reason why we recommend having the bulbs changed by a qualified workshop.
- NEVER use metal tools (e.g. a screwdriver) or sharp or pointed plastic tools to lever out the rear light - risk of damaging the paint.
Note
Make sure you have a soft cloth ready to place under the glass on the rear light, to avoid any scratches.


