-

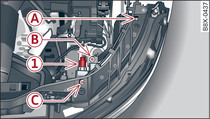
- Fig. 1 Front headlight: Securing points and electrical connector
-

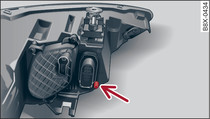
- Fig. 2 Headlight unit: Mounting for vent hose
Check that the rubber seal is secured on the outside of the headlight.
Carefully slide the headlight all the way in WARNING!.
Push the vent hose onto the plastic nipple -arrow- Fig. 2 as far as the stop.
Hold the front of the headlight in place and plug in the electrical connector -1- Fig. 1.
Check whether the new bulb is working.
Tighten the bolts Fig. 1. Use the small Torx bit for bolts -A- and -C- and the large Torx bit for bolt -B-.
Caution!
- If water is allowed to collect in the headlight unit, this can lead to a headlight malfunction or damage. This can be avoided by ensuring that the vent hose is correctly seated.
- Make sure that the rubber seal on the outside of the headlight is correctly seated to prevent damage to the headlight and/or vehicle body (e.g. wing panel).
Note
The stop bolts ensure that the headlight is seated properly. Please do not interfere with the settings of the stop bolts.
